Category Archives: Men’s Health
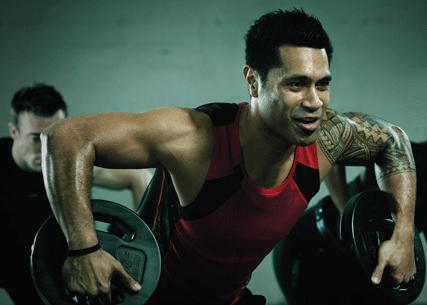
4 Moves To Increase Your Back Width
Increase your spread for the V-taper physique all bodybuilder’s covet.
Nothing looks quite as ridiculous as huge, ripped biceps attached to a back with the width of a spider monkey. Building an enormous, wide back is crucial to your overall aesthetic. Not only is a wide back imposing in and of itself, but it also makes your waist look smaller, increasing the ever important V look all bodybuilders covet. On your next back day, add in these 4 exercises and watch your back width explode.
STRAIGHT-ARM PUSHDOWNS
These were a favorite of Iron Legend Doug Young. The straight-arm pushdown is one back exercise where the lats are almost exclusively isolated, there is very little bicep activation like most back exercises. I have found that Lat development really explodes when these are incorporated. Use the straight bar attachment on the weight stack, keep the arms straight and lower the bar to the thighs while leaning forward at the top (emphasizing stretch). Do 5 sets of 15 reps.
ONE-ARM LAT PULLDOWNS
These effectively isolate the lats, resulting in a serious increase in back width. Put the handle attachment on the lat pulldown stack. Grasp it with one hand and fell a big stretch on the top. Pull it down so the handle is at shoulder level. One-arm lat pulldowns should also be done with the strictest of form, and muscle intention is key here. Feel the lats doing the work. Do 5 sets of 10-15 repetitions.

WIDE-GRIP PULLUPS
Wide grip pullups are absolutely essential to developing an impressively wide back. They are more lat intensive than their normal grip counterpart. To perform wide grip pullups grasp the pullup bar wider than shoulder width, and make sure to come all the way down on each rep. Use muscle intention to really feel your lats doing the work. Pull yourself all the way up so that the pullup bar is at around chest level. Do these strict (no swinging, go all the way down and all the way up.) Once you can do 10 strict wide grip pullups, start adding weight. Do 5 sets to failure in this exercise.
V-GRIP PULLUPS
These are not as popular as they once were, they used to be a staple in back training. Let’s bring back this oldie but goodie. Put the V-Grip attachment over the top of the pullup bar, pull yourself up and touch your chest to the v-bar attachment. Concentrate on using your lats and upper back to pull yourself up. Keep these strict, no swinging. Do 5 sets to failure.
As you can see, when trying to develop a wide back strict form and muscle intention are key. Add these exercises in on your back day and watch your spread grow.
One-Arm Lat Pulldown
Build symmetry in your back with this unilateral variation of a classic machine move.

Are you finding that your lats are lacking a little in the symmetry department? In other words, is one side more developed than the other?
Training bilaterally, as in with a fixed barbell or long bar attachment, can have the effect of allowing the stronger side of your body do slightly more work than the weaker one, creating a visual imbalance in your musculature.
Unilateral training (training each side independently) can solve this problem, creating optimal symmetry, and the one-arm lat pulldown is a great exercise for attacking this issue.
TOOLS
- Lat pulldown machine
- D-handle attachment
EXECUTION
- Attach a D-handle and position yourself as you would for a regular lat pulldown.
- Reach up and grasp the handle with a neutral grip (palm facing in), with your torso fully erect, arm fully extended and chest out. (You may need to stand up first to pull the handle to you, then sit down on the seat.)
- With your working arm fully extended, lean back 10–15 degrees and look straight forward.
- Drop your shoulder by depressing your clavicles, and avoid pinching or shrugging your neck.
- Squeeze your shoulder blades together, take a deep breath and pull the handle to your upper chest, focusing on the lats and pulling your elbow back and down.
- Pause, then slowly release the bar back to the start.
TIPS
- Initiate the pull with slow, even force from the lats; jerking will cause your lower back and biceps to initiate the movement.
- For variation and to hit the muscles from a slightly different angle, change your grip so your palm faces forward or backward.
- To increase your lat involvement and range of motion, lean back as you pull through the movement.
- To focus on the middle of your upper back (rhomboids, traps and lats), lean farther back and start your pull with your torso at a 45-degree angle.
- For increased rear delt activation, flare your elbow out to the side, keeping it high throughout.
THE HIT LIST
Primary Muscles: Latissimus Dorsi, Teres Major, Upper Trapezius, Middle Trapezius, Lower Trapezius, Rhomboids
Secondary Muscles: Posterior Delts, Biceps Brachii, Brachioradialis, Brachialis, Wrist flexors

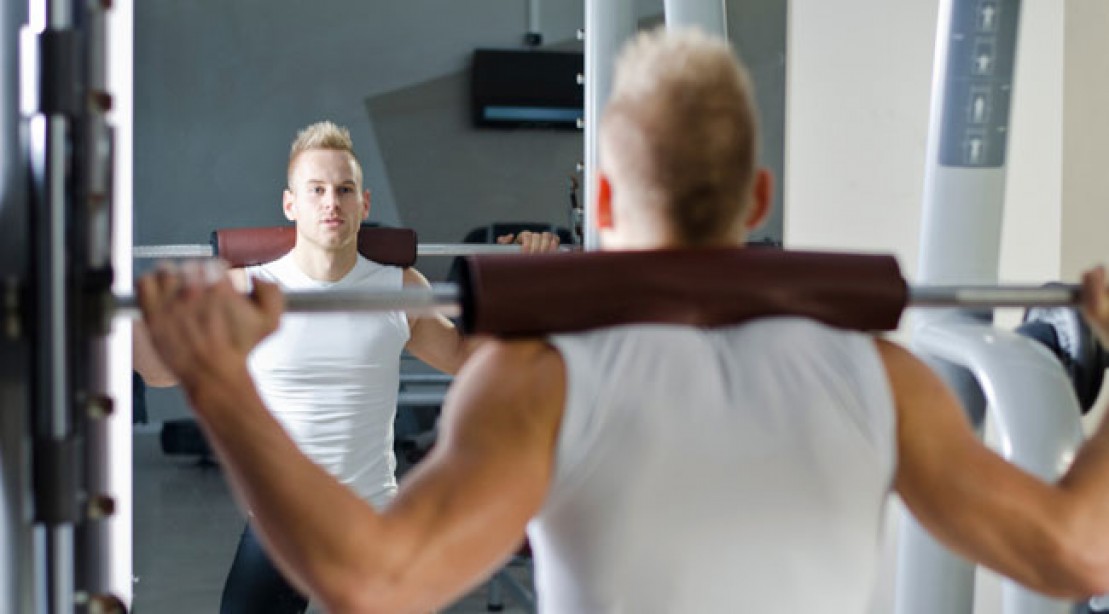
Shock Your Muscles With Unilateral Training
Crush your muscle and strength growth plateaus with this alternative lifting technique.
Are your workouts getting stale? Are you having trouble getting pumped? Have your strength gains stalled out? While there are many reasons why you may find yourself in this situation, much of the time it’s the result of the ineffectiveness of your current training program. At one time you may have thrived on exactly what you are doing now, but you may have reached a point where a change is necessary in order to continue progressing.
The body is an adaptive machine and if you continually provide the same types of stimulation, your body will quickly adapt and fail to respond to your workouts. You must keep finding ways to provide a novel “stress” to your body and muscles in order to force “overcompensation” in the form of increased strength and hypertrophy.
There are many ways to go about revamping and revitalizing your workout routine, but one of the best ways I’ve found to wake up muscles that are napping on the job is by taking things one at a time. Unilateral training, or training one limb/side of the body at a time, is one of the most effective methods available for stepping up the intensity of your workouts and helping to push past plateaus in both size and strength.
UNILATERAL EXERCISES HAVE SEVERAL ADVANTAGES OVER STANDARD TRAINING THAT CAN CATAPULT YOU TO NEW LEVELS:
(1) You will be able to concentrate and focus more intensely on the target muscle, which in and of itself can lead to better gains.
(2) You will recruit more muscle fibers and fatigue more motor unit pools with each rep than with standard two-armed training.
(3) You will take steps toward overcoming strength imbalances between your right and left sides. For example, if your right biceps is stronger than your left, whenever you do a standard barbell, cable or preacher curl, your right arm will dominate the movement, especially as you fatigue, effectively reducing the stimulation that the left biceps receives. This only serves to enhance your strength imbalance as well as cheat your left arm out of growth.
However, by utilizing unilateral exercises, you will be forcing the weaker side to do all of the work on its own, rather than constantly relying on the dominant side to assist in lifting and lowering the weight. Additionally, when you begin to even out the level of strength between corresponding muscles on both sides of your body you will become stronger in all of the standard two-arm/leg exercises.
I’m not saying that you should abandon standard training for a completely unilateral approach; however, I do believe that everyone should incorporate at least one single-limb exercise at each bodypart workout. I generally recommend that you perform unilateral exercises toward the end of your routine for a particular body part. I am sure that most of you are familiar with such unilateral exercises as concentration curls, one-arm rows and kickbacks, but you are truly missing out if you have not tried such muscle-mashers as single-legged leg presses or squats, single arm dumbbell shoulder presses, single arm crossovers, single arm lat pulldowns, single arm dumbbell upright rows, etc.
These exercises will stress your muscles in a new and different way, forcing your body to “overcompensate” and grow larger and stronger. Additionally, you will effectively engage many of the stabilizing/balancing muscles by training one side at a time which will only serve to provide you with a more “complete” looking physique as well more total body strength and coordination.
Here is a list of unilateral exercises to incorporate into your workouts:
- Chest: single arm machine chest press, single arm cable flye, single arm cable crossover, single arm pec deck flye
- Lats: single arm dumbbell row, single arm seated cable row, single arm pulldown
- Delts: single arm dumbbell press, single arm machine press, single arm dumbbell/cable lateral, single arm dumbbell upright row
- Biceps: single arm cable curl, single arm preacher curl, single arm dumbbell curl
- Triceps: kickbacks, single arm lying/seated extensions, single arm pushdowns
- Legs: single leg squats, single legged leg press, single leg extensions, step-ups, single leg lying/seated/standing leg curls, single leg stiff deadlifts
- Calves: single leg seated raise, single leg standing raise, single leg calf press
- Traps: single arm dumbbell/machine shrugs, dumbbell cleans
- Lower back: dumbbell deadlifts
- Forearms: single arm dumbbell wrist and reverse wrist curl
I’m sure if you think about it you can come up with dozens more unique unilateral exercises of your own. Start by adding one unilateral exercise to each bodypart workout and if you are finding that you are getting excellent results, perhaps add a second one. Actually, I have had some of my very best and most intense workouts by training exclusively unilaterally. Just remember that some unilateral exercises can be difficult to perform at first and until you have it mastered, you might not get the full benefit from it.
It certainly takes a few workouts to get used to single leg squats and deadlifts, but once you do, you can rest assured that you will see new gains in muscle and strength rather rapidly. Stick to each new unilateral exercise for about 6-8 weeks before you switch to another, but don’t be afraid to “play with” and tweak your form a bit each workout until you find what feels best to you.
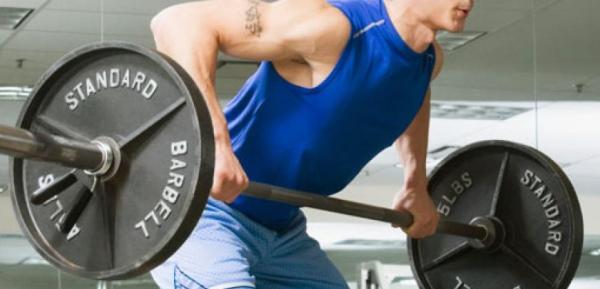
BACK ATTACK: THE BARBELL ROW
We break down this lift and give some practical advice on how to build it into your program.
Like the bench press is the king of chest exercises, the barbell row is ruler of its domain for the lats and traps. With most other lat exercises, you don’t directly fight gravity – a pulley eases the struggle on cable exercises. And with the barbell row, you can really load up on the weight, making it great for upper back development. From a true strength standpoint, this exercise is a staple of most elite athlete programs. And when it comes to sheer size, no lifter should leave this lift out of his routine.
HOW TO:
Take a wide-grip palms down approach while stabilizing your feet at shoulder width and bending your knees about 15 degrees. Your bent-over position should not be parallel with the ground but at about a 60 degree trunk angle. If you start by retracting (pulling in) your scapulae you will further isolate your lats, but you will need slightly lighter weight. Some prefer the rounded upper back start and retract during the lift to make the traps work in conjunction with the lats. In either case, stick your chest out, flatten your lower back and pull the weight hard into your upper abdomen while sending your elbows backward. Return the weight under control and pause to avoid momentum from taking over.
VARIATIONS:
While the barbell version is superior for overall development, using cable and dumbbell variations works well too. For a more refined barbell version that uses a little more biceps, use a reverse grip (palms up) just outside your hips on the same bent over row movement. Your pull will be more to your lower abdomen and shift the emphasis to your lower lats, with some help from your bi’s. Some gyms also have a modified barbell with neutral handles.
OVERVIEW:
Many people avoid the bent over row as it requires more lower back and ab control to maintain a solid posture. Also, it is often thought of as an athletic lift and many gymgoers still avoid it like the plague. But if you’re not rowing with barbells, you’re limiting the progress you can make, both in muscle size, shape and quality.
TIPS:
- Minimize the amount of momentum you use, or else you risk jeopardizing your posture. This can lead to injury, or at the very least, an ineffective set. Experienced lifters may use 1-2 calculated cheat reps at the end of a set.
- Change grips and hand spacing from set to set, or workout to workout, in order to encourage complete back development.
- If lat development is high on your priority list, always aim to perform this exercise first in your back routine when you are at your strongest.
- Complete your back routine with pulls through different planes such as the seated cable row, lat pulldown, standing cable low row and straight-bar lat pulldown.
- As you progress, try to build in advanced techniques such as forced reps, rest-pause and negatives to elicit even greater gains out of your lats and middle back.
PROGRAM IT:
To get all of the benefits that the barbell row has to offer, perform it first in your back routine, doing 8-10 reps for four sets. You should be aiming for positive muscle failure at that range – if you can do 11 reps, you’re going too light.
Exercise	     		        Sets               Reps
Barbell row			         4                 8-10
Seated cable row		         4                  10
Lat pulldown			         4                  10
Standing cable low row              	 4                  10
Staight-bar lat pulldown	         3                  12
THE ULTIMATE LAT WORKOUT FOR A BIGGER BACK
Add impressive back width for an intimidating V-taper physique and wings that’ll make the angels jealous.

One of the most impressive aspects of the bodybuilder’s physique is the infamous “V” taper. You know, the type of shape that makes it look possible to jump of a cliff, spread you lats, and do a little hang gliding. Think about the physiques of some of our most massive Mr. Olympias…Lee Haney, Dorian Yates, Ronnie Coleman, and Jay Cutler. They all shared one thing in common…backs so wide that each lat had its own zip code! Problem is, truly wide lats are a rare commodity indeed and although I see dozens of trainees toiling away in the gym doing set after set on the lat pulldown machine, sometimes with the whole weight stack, so few of them are challenging the width of a single doorway. So where does the problem lie? Well, as I see it, there are several.
WRONG EXERCISES
Although the lat pulldown is a wonderful back movement that certainly has its place, it can not replace the true back builders like chins, pullups, bent rows, seated pully rows, T-bar rows, dumbell rows, and deadlifts. Those that do not make these exercises the foundation of their back routine are not only narrow minded, but will always be narrow period!
POOR FORM
This is perhaps the most prevalent problem in faulty back training and the number one reason, in my opinion, that spectacular back development is so rare. Usually one or all of the following mistakes are made by most when training back…1) Too much weight is used! Stop swinging and jerking and control the exercise throughout the entire ROM, 2) Failure to “set the body” correctly during the movement! Keep your chest out, shoulders back, and a slight arch in your lower back…and you must keep this position throughout the movement, 3) Not using a thumbless grip! By bringing your thumb to the same side of the bar as the rest of your fingers you will effectively take some of the forearm flexors and biceps out of each lat exercise. Reinforce your grip with lifting straps if you must.
LACK OF ANGLES AND GRIP VARIATIONS
The back is a very complex group of muscles and for full development you must assault it from unique positions and angles as well as utilize the effects that different grips provide. You should include one exercise in which you pull vertically (pulldowns, pullups), one in which you pull horizontally (seated pully rows, seated machine rows, Hammer rows), and one in which you pull from the floor in a “bent” position (bent barbell rows, T-bar rows, dumbell rows, spider rows). In addition, perform one exercise with an underhand grip, one with an overhand grip, and one with a parallel grip.
NOT USING PULLOVERS AND STIFF ARM PULLDOWNS
Both of these exercises isolate the lats and teres muscles right where they tie into the armpit, and they do so without any bicep or forearm activation. This is very advantageous as they can be used to “pre-exhaust” the lats before rowing and pulldown exercises are performed, or, they can be used at the end of a back workout to get just a bit more out of those lats when the biceps are beginning to tire.
THE LAWS OF FAT-BURNING
Want to see your six-pack again – or for the first time ever? You’ll find all you need to know to get superlean in a dozen simple rules.
No question about it, burning fat is a 24/7 endeavor. To keep the fires hot, you need to eat every 2-3 hours throughout the day. Not only that, but you must choose the right foods in the right amounts to keep your metabolism revved up so your six-pack will be ready for its close-up. The way we see it, there are some fundamentals – laws, if you will – that are all you need to shed that unwanted blubber from your midsection and elsewhere. Most of them are nutrition-driven, but training comes into play as well. Your mass-gaining phase is over for the time being; now it’s time to get lean. These laws of fat-burning will help get you there.
1. SLASH (CALORIES) AND BURN

Step 1 revolves around simple math: You must eat fewer calories than your body is accustomed to in order to drop bodyfat. When a calorie shortfall is created, the body responds by digging into bodyfat reserves to make up the difference. And presto, you grow leaner. All other laws aside, this one heads the list every time, no matter what dietary approach you take.
Do This: Most guys who are fairly active and exercise regularly burn about 18 calories per pound of bodyweight or more per day. On that basis, a 200-pounder would consume 3,600 calories daily. To start dropping bodyfat, reduce your calories to between 14 and 16 per pound of bodyweight per day on workout days, or 2,800-3,200 calories daily. On nonworkout days, drop to about 12 calories per pound per day (2,400 calories for the guy who’s 200 pounds).
The easiest way to cut calories? Eliminate excess dietary fat – meaning no butter, oils, salad dressings (low-fat or fat-free dressings are okay); remove the skin from chicken; substitute egg whites for most of your whole eggs; avoid whole-milk dairy products; and ditch marbled red meats such as rib-eye for lean cuts such as flank. Keep some healthy fats in your diet, such as salmon, mixed nuts, peanut butter and avocados.
2. CURTAIL CARBOHYDRATES

Though calorie control is a must, hormonal control is nearly as important. Coupled with calories, hormones govern fat-burning. Suppress fat-storing hormones and you can expect a significant amount of bodyfat to melt away. The ideal way to control these hormones is to keep your carbohydrate intake in check, since carbs kick up insulin, a hormone that inhibits fat breakdown and drives fat storage. Eat fewer carbs and insulin levels tend to moderate, leading to fat loss.
Of course, not all carbohydrates are equal. In short, fast-digesting carbs tend to create a large insulin burst, leading to more potential fat gain. These carbs include white bread, most cold cereals, any sweets, rice cakes, white rice and white potatoes. Conversely, slow-digesting carbs (found in whole-grain breads, oatmeal, sweet potatoes and legumes) don’t cause much of an insulin rise, so these should make up the vast majority of your carb consumption.
Do This: The commonsense approach is to halve your carbohydrate portions. If you tend to eat a large bagel for breakfast, eat only half and save the rest for tomorrow, or simply eat a smaller bagel. If you typically eat 2 cups of pasta at dinner, eat just one. In time, you’ll see the effects of insulin control.
As for carb choices, the aforementioned bagel should be 100% whole wheat, not white. At all times during the day, in fact, choose whole-grain foods over refined ones, the only exception being immediately after a workout, when fast-digesting carbs reign supreme for boosting insulin and replenishing muscle glycogen stores (see Law 8). Keep carbs to less than 2 grams per pound of bodyweight per day.
3. STRESS PROTEIN

Is a calorie truly a calorie? Not always, because different types of calories can affect your body and your results differently. Dietary fat, for example, is more “fattening” than protein or carbs because it’s less likely to be used to build your body. Granted, carbs can potentially make you fat, but they also directly fuel your training. Protein? That’s a no-brainer: It builds muscle. Fat does neither, but it isn’t useless; moderate amounts of it support vitamin absorption and help manufacture hormones.
But if you’re trying to get ripped, you must minimize your consumption of fat. Protein, on the other hand, not only adds to your muscle – key in boosting the metabolism – but actually increases your metabolism more directly. The body burns more calories processing protein than it burns to process carbs or fat, known as the thermic effect of food. That’s the main reason diets that include a lot of protein result in greater fat loss than low-protein diets, even when both diets contain the same amount of calories.
Do This: We can’t harp on this advice too much: Eat at least 1 gram of protein per pound of bodyweight every day. Your major protein sources should be lean meats (chicken, steak, turkey breast, tuna), egg whites (the yolks contain the fat, so discard most of them when you’re trying to lose fat), protein powder (whey or casein) and low-fat cottage cheese. As for fat, limit it to 20%-30% of your total daily caloric intake.
6 WAYS TO BURN MORE FAT
No need to thumb through volumes of fat-burning research to get the physique you want. Inject these six tips into your current routine to get lean in a hurry.

You’ve put in the brutal, twice-a-day workout sessions, eaten enough chicken breast and steak to support a small farm, and lined up the correct supplements like a chemical engineer. Now you’re left with mounds of protein-infused muscle covering your body, a true physical fitness achievement. Yet like a supermodel draped in a heavy trench coat, the goods are hidden from sight by a layer of fat. How do you shed the blanket and allow onlookers to gaze in awe at your accomplishments? Here are six steps to take for your big reveal.
1. START YOUR ENGINE
The best way to win a race is to start you motor early. People have told you since you were a kid that breakfast is the most important meal of the day. What they probably didn’t tell you was that people eat about the same amount of food each day. By starting that process earlier, you’ll find that you’re not playing catch up later in the day or eating unhealthy foods in emergency hunger mode. Having breakfast will jump start your metabolism, allowing the muscles you’ve built to be nourished while initiating the fat burning process. Remember: the early bird gets the fat-busting worm.
2. GRAZE PHASE
Besides enjoying an early, substantial breakfast, the best way to burn fat is to set up an eating schedule of 5-8 small meals spread out a few hours apart throughout the day. This style of consumption, also referred to as “grazing,” provides a constant flow of nourishment to the muscles, keeping your metabolism surging throughout the day. Having “three squares a day,” such is the custom in most places, means more total calories at each sitting, making it tougher for your body to digest food for fuel and harder for your metabolism to catch up. Smaller meals, more often is definitely the way to go. Eating this way also decreases the risk of overeating.
3. MIX IT UP
To bridge the fat burning process from the kitchen to the gym, structure a workout that keeps the fire stoked. The best way to transform a normal, muscle-building routine into a super charged fat-burning workout is to mix typical resistance exercises with bodyweight movements. This added challenge brings out an increased cardiovascular experience, leading directly to fat loss and heightened endurance. After massive bench press reps throw in a set of push ups. Following a set of cable rows, add some pull-ups. Dips will follow triceps extensions, and walking lunges will insure the leg press did its duty.

4. GO HERBAL
In addition to following your usual lower-carb, high protein diet, it helps to add in green tea to push your fat-burning to a new level. Green tea, taken in capsule form or as a drink, continues to yield new and exciting benefits for physique-minded individuals and is one of the most research-affirmed supps you can have.
5. ZERO IN ON TARGET AREAS
Spot reduction, which until recently was considered a myth, can prove to be an effective aid for fat loss. By targeting your stubborn areas with some continuous, high-rep training and following that immediately with 30 minutes of cardio, you can mobilize more fat from the trained area. Not a believer? A study conducted at the University of Copenhagen (Denmark) had male subjects perform single-leg extensions for 30 minutes straight with light weight. They found that subcutaneous fat cells (those just under the skin) in both the exercising and resting thighs. The working leg had a significant increase in blood flow to and lipolysis from the subcutaneous fat cells. In other words, the fat cells surrounding the working muscle released more fat into the blood stream, meaning more fat is being used as fuel. The cardio that follows is to keep that fat from re-depositing itself on the premises!
6. CARDIO BURSTS
One great way to get the fat burning benefits of running while performing a standard weight training routine is to insert short, intense bouts of cardio throughout your workout. These “bursts,” placed every 15 minutes during an hour long routine, help rev your metabolism both during and after your workout. Think of it as extended-rest interval training. One way to do this would be to complete a 90-second sprint on a treadmill after every exercise in your normal 8-10 exercise routine. This is also one way to get your cardio in without spending an additional 20-30 minutes in the gym after your last rep.
15-MINUTE WORKOUT: RUN THE RACK
Short on time and have a rack of dumbbells? Well, get to work!

Pick your four favorite biggest, baddest chest exercises and back exercises – two for the chest and two for the back (do not use pullups for this workout). Perform all the exercises back to back alternating between pushes and pulls.
For example: in one continuous set perform a dumbbell incline bench press, dumbbell bent-over row, dumbbell flat bench press, and single-arm dumbbell row. After doing one set of 8 to 10 reps at 60% of your max starting weight of the first two exercises of your set rest 60-90 seconds and then begin your first set of your first exercise with as much weight as you can do for 8 to 10 reps. Drop to the next size dumbbells in the rack and do as many as you can. Continue to do this method until you get to 50 (or so) total reps. Once the first exercise is completed perform the next three in the same manner until you have finished all four exercises.
WORKOUT TIPS
I used all dumbbell exercises thinking logistically simple for all of you guys at the big box Gyms but a seated row or lap pulldown will work just as well.
At a 2-0-1-0 tempo for approximately 200 reps total you should finish your workout in right around 15 minutes. It will be a DOMS inducing hypertrophy fest.
Don’t get too greedy at the beginning. Trust me. 50 reps is a long set. If anything, figure conservatively with the first weight of that work set.
THE 15 PAY OFF
Many of you probably have not tried drop sets. Even if you have, a drop set up to 50 reps still might be rare to you. Drop sets are great way to continue pumping that muscle while in a fatigued state and can create some great hypertrophy results. If you have more time perform two to three sets of this workout and see how your muscles feel 48 hours later. Don’t go to high with your initial work set. If the weight fell to like you still have plenty of reps ahead of you. When you feel your form start to fail drop the weight. Proper execution will create better results than you herking and jerking dumbbells around the weight room.
GAIN GREATER MASS WITH DROP SETS
Achieve greater muscle growth with this proven lifting approach.
Drop sets are a great way to increase muscle mass as they are a quick and easy way to increase blood flow into the muscles, get the heart pumping and most importantly of all fatiguing the muscles to ensure muscle hypertrophy.

WHAT ARE DROP SETS?
Drop sets are essentially a technique where you perform an exercise and then drop (reduce) the weight and continue for more reps until you reach failure. Called the ‘multi-poundage system’ this method was discovered in 1947 by Henry Atkins, who was the editor of Body Culture magazine.
The reason why drop sets work is that in any given set you are only recruiting a certain amount of muscle fibres. By then stripping the weight down and going lighter you recruit different muscle fibres, which should help the muscles achieve growth that couldn’t be achieved by sticking with the same weight.
There are numerous variations of drop sets. Two of the more popular variations include:
RUNNING THE RACK
This technique is performed when using dumbbells. Once you reach failure with a certain dumbbell weight, pick up a lighter weight off the rack and perform as many reps as possible. Continue down the rack until failure.
Sample routine using Running the Rack: Alternating Dumbbell Curl
Set 1: – chose a weight you’d fail at 4-6 reps.
Set 2: – reduce weight by 5lbs. 8-10 reps
Set 3: – reduce weight by 5lbs. 10-12 reps
Set 4: – reduce weight by 5lbs. 12-15 reps
Set 5: – reduce weight by 5/10lbs. 15-20 reps
Rules: 1st set should be heaviest. No rest in between drops sets. “Walk down the rack” selecting weights.
PLATE STRIPPING
When using a barbell, plates are stripped from each side until you can no longer perform reps with the given weight. Ideally, you want to have a training partner who can strip the weights for you, so you can maintain your position.
Your training partner can quickly pull a plate off each side of the bar when you can no longer do reps with a given weight. He/she can continue to strip away plates, up to two or three times, until you reach a point very close to total muscular exhaustion.
Sample routine using Stripping: Flat Bench Press
Set 1: – chose a weight you’d fail at 4-6 reps.
Set 2: – strip weight by 10lbs: 8-10 reps
Set 3: – strip weight by 10lbs 10-12 reps
Set 4: – strip weight by 10lbs 12-15 reps
Set 5: – strip weight by 20lbs 15-20 reps
Rules: 1st set should be heaviest. No rest in between drops. Ensure training partner strips weights for you.
8 BODYBUILDING TIPS THAT EVERY BEGINNER SHOULD KNOW!
 If you’re a beginner just getting started on a bodybuilding plan, you’re likely feeling slightly intimidated. Starting a new activity of any type can seem a bit scary at times, and since there are so many different exercises to perform in a weight training program, this only adds to the intensity that you’re feeling.
Luckily for you, if you’re equipped with some basic knowledge, you’ll be in the perfect position to get going. The great news is that as a beginner you will experience results at an accelerated level and will notice differences in how you feel and look in as little as a few weeks.
Here are the main points to know.
1. Perfect Proper Form
First things first, it’s of utmost importance that you get proper form down pat when you’re just starting. Getting off on the wrong foot with form will just lead to incorrect habits that are hard to break down the road. If you’re uncertain about any exercises or need guidance on what proper form is for any exercise you are going to attempt to do, book a session with a personal trainer to show you.
This is the number one biggest thing you must get right. Incorrect form leads to injuries and lack of results.
2. Focus On Major Lifts First
Next, you’ll want to focus on major lifts first during the workout. Any exercise that works more than one muscle group needs to come ahead of those that work on a single group. The reason for this being that those exercises are going to take much more energy to complete, therefore you want to be feeling fresh.
These include the exercises of bench press, squat, dead-lift, shoulder press, and bent over row. If you’re using machines, they will likely be called leg press, chest press, seated shoulder press,horizontal row, and lateral pull-down.
3. Use A Rep Range Between Eight To Twelve
As far as rep ranges go, beginners would be best advised to perform somewhere between eight and twelve reps. Since you likely aren’t going to be using an extremely heavy load, this will enable you to work in a slightly higher rep range while still seeing significant strength and muscular size and definition improvements.
Once you get more used to the different weight lifting exercises, then you can bring the rep range lower if you want to really focus on bringing your strength level up.
4. Take At Least One Day Off Between All Workouts
Another smart tip for all beginners is to aim to take at least one day off between each workout you do. This is going to really help control the degree of soreness you experience as well as helping to prevent you from feeling too overwhelmed with numerous sessions each week.
A full body workout is typically the best choice for those who are new to weight lifting and it will allow you to hit all the body parts three times a week for optimal results.
5. Don’t Forget To Stretch
Stretching is something that many people, whether beginner or not, leave out from their workout. This is a big mistake however as the stretching is significantly going to decrease the amount of soreness you experience while increasing your range of motion so you’re able to benefit more from the lifts you do complete.
Try to perform ten minutes of stretching after each workout you do, focusing on all the major muscle groups. You can also perform stretching activities on your day off while watching television for instance to further help reduce the amount of soreness you experience.
6. Focus On Eating Before And After The Workout
What you eat before and after your workout is going to play a big role in how well you perform during that workout and how quickly you recover afterwards.
While as a beginner it’s unlikely that you’re going to really start meticulously planning your food intake, making an effort to make sure you’re eating foods containing both protein and carbohydrates before and after your workout will go a long way towards helping you get better nutrition.
7. Combine Weight Machine Exercises With A Few Free Weight Movements
Generally speaking, free weight exercises are superior to weight machine exercises, but for the beginner using weight machines is a nice way to ease into the process of weight lifting, while also helping ensure you are using proper form. To get the best of both worlds, consider combining some free weight exercises with machine exercises.
Most people can easily learn how to do free weight exercises such as bicep curls, tricep extensions, lateral raises, and so on, but using a leg press machine before jumping into squats, a chest press machine before attempting bench press, and so on can allow you to obtain a greater comfort level while having that machine guidance.
8. Do Your Cardio Training After Your Lifting
Lastly, another common misconception beginners have is that they should be doing their cardio before they proceed to their lifting. This is actually backwards; cardio should be done after your weight lifting or in another session altogether. This is because of the fact that you want the most energy for your lifting since it’s going to primarily depend upon muscle glycogen, while moderate cardio can utilize fat as fuel.
Doing your weight lifting first also ensures that you can put the most energy into the lifts, increasing the strength gains you realize.
CONCLUSION
So, keep these quick tips in mind. It’s always a good idea to book a session with a personal trainer to get set up on your first program until you have a better understanding of all the concepts involved with weight training. After that point, you can start playing around with your own program, implementing advanced training principles to help kick your results up a notch.
Reference : BeautynFitness
